How to use tebIQ

← Back to tebIQ

Every feature, explained in plain words — with pictures. Type what you're trying to do (for example “second visit”, “translate”, or “sign out”).

🔍

🚀 Getting started

Record a visit, get a note, put it in your EHR. That's the whole loop — everything else builds on it.

The main page at a glance

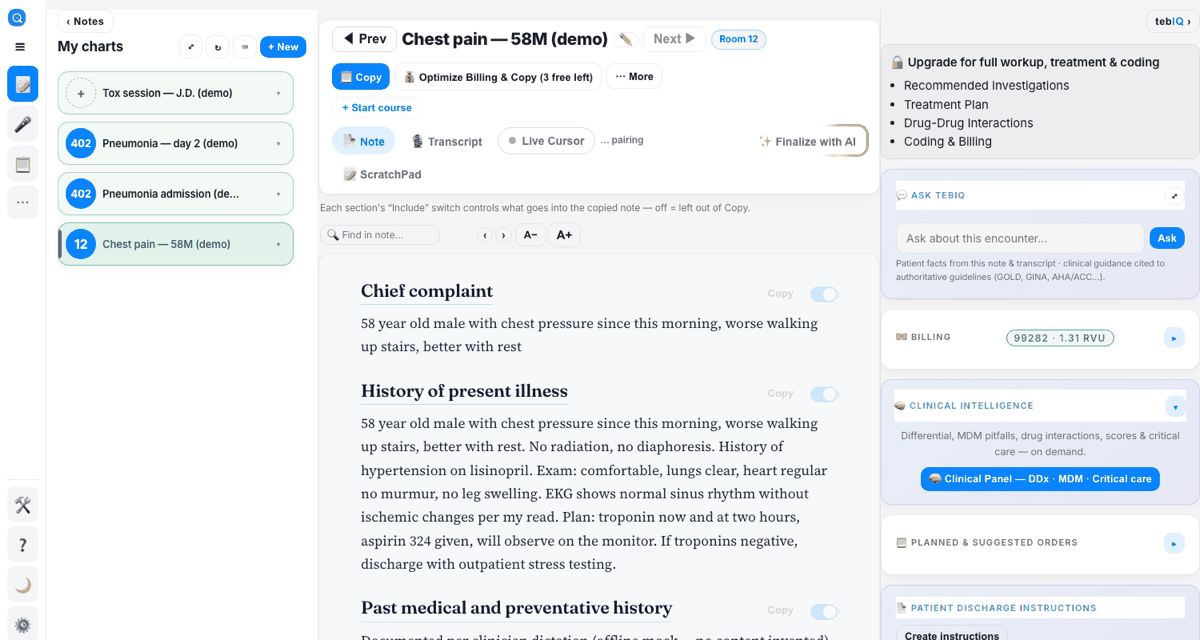
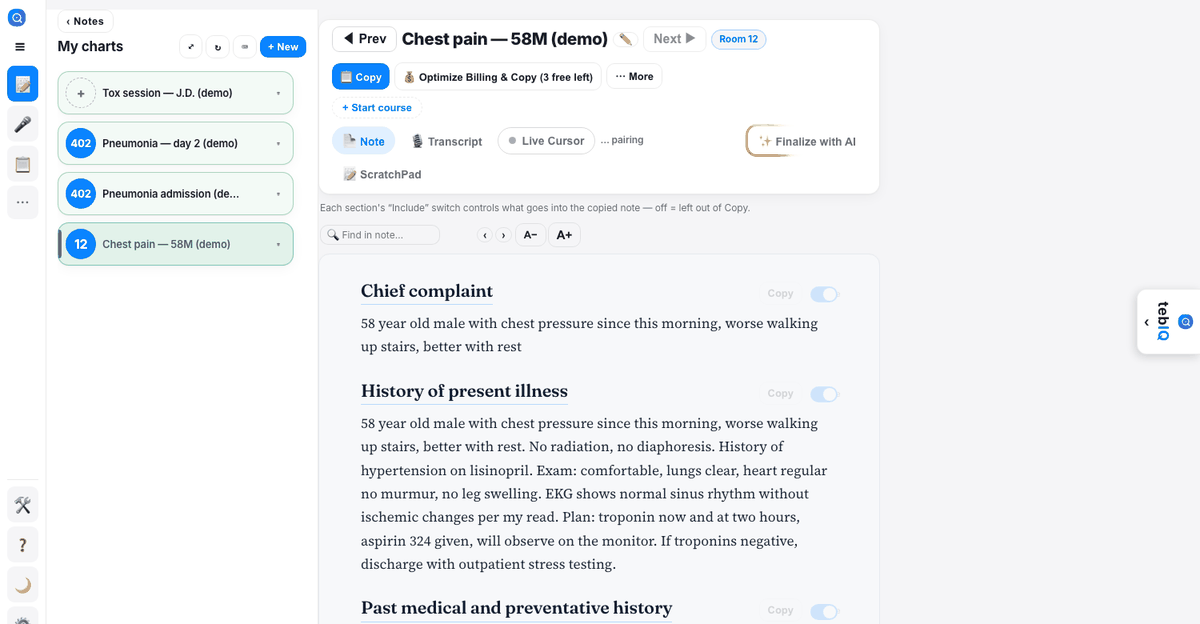
tebIQ opens on My charts — your notes on the left, the open note in the middle, and the clinical panel on the right. The menu rail on the far left gets you everywhere.

Good to know: the rail shows icons only; click at the top to see the labels.

  1. 📝 My charts — today's notes. Click one to open it.
  2. 🎤 New note — record or dictate a new visit.
  3. 📋 ED board — your patients from the last 24 hours with disposition reminders.
  4. ⋯ More — Patients, Triage, Dictations, Visits, Templates, Dot phrases, and more.
  5. The tebIQ › tab on the right edge slides out the AI panel: Ask tebIQ, billing, the clinical panel, orders, and discharge instructions.
  6. At the bottom: Mode (Focus vs Pro), ❓ Guide (this page), Theme, ⚙️ Settings, and your account card.
tebIQ main page: note list on the left, open note in the middle, clinical panel on the right
The main page (demo data).

Record a visit on the web

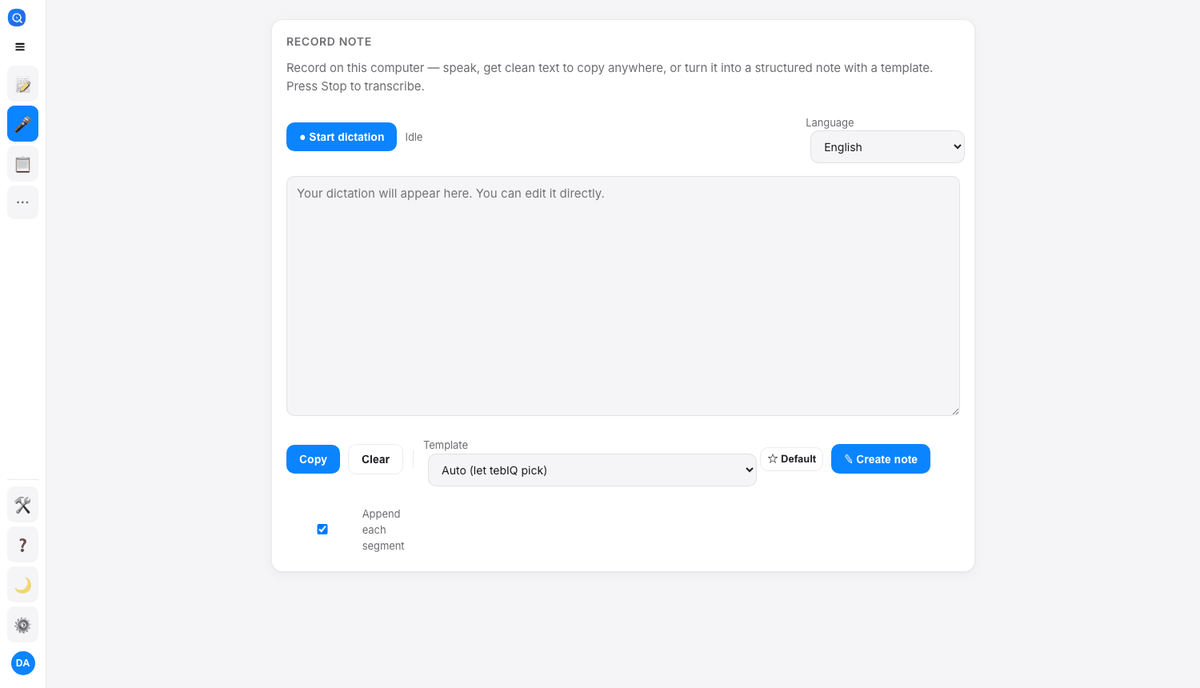
Speak naturally during or after the visit — tebIQ turns the recording into a structured note in your specialty's format.

When: any visit where you're at a computer. Use the phone app when you're moving room to room.

  1. Click 🎤 New note in the left rail.
  2. Pick a Specialty and Note type — or leave them on auto and tebIQ figures it out from what you say.
  3. Click record and speak (or type/paste a dictation). Pause any time — interruptions happen — and resume when you're back.
  4. Click Generate. The note appears in My charts in a few seconds — you can keep working while it writes.

Tip: say the room number ("room 12") and tebIQ tags the note with it, so the list reads like your track board.

Interrupted? The recorder saves as it goes, on your device. If the browser crashes, the tab closes, or transcription fails, a Recover recording card appears the next time you open the recorder — one tap picks up where you left off. Nothing is lost. (Keep the recording tab in the foreground: browsers pause the microphone in background tabs, and the on-screen hint reminds you.)

New note screen with specialty and note type pickers and the record button
The New note screen (demo data).

Record a visit on your phone

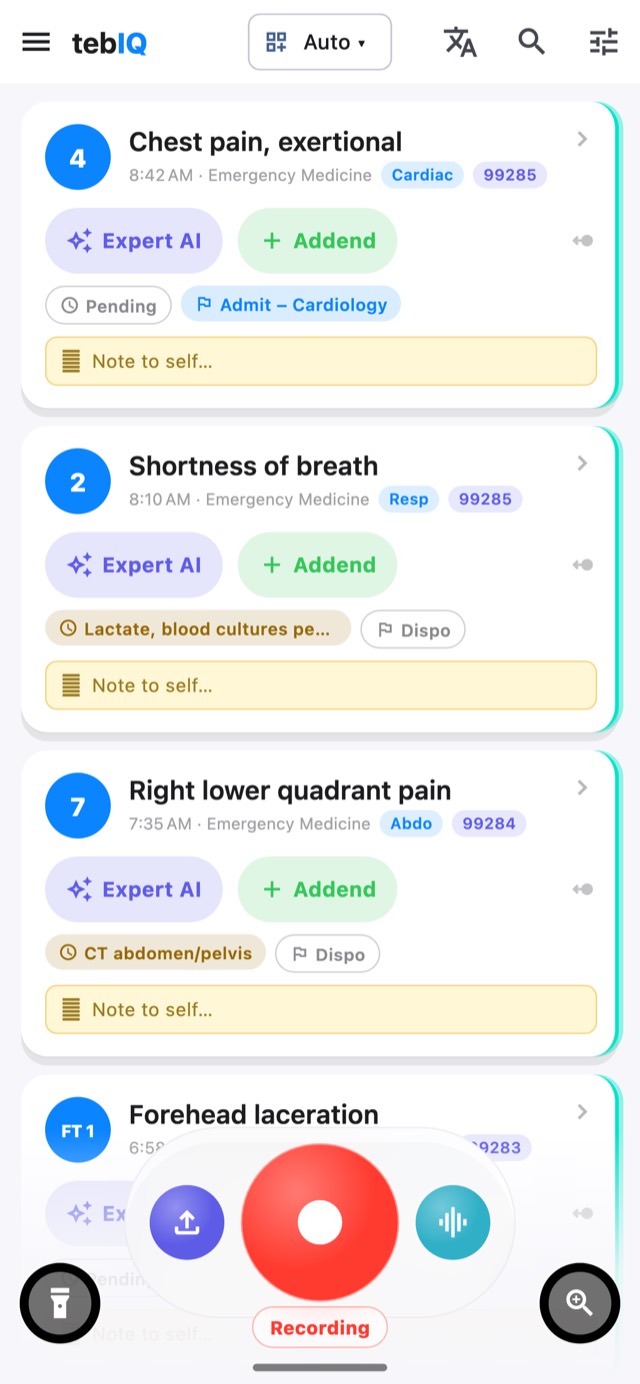
The mobile app is built around one big button. Tap, talk, stop — the chart is on your computer before you're back at the desk.

When: at the bedside, on rounds, in the hallway between rooms.

  1. Open the tebIQ app. The Record orb is front and center.
  2. Tap it to start. A red REC dot pulses while it listens. Tap pause any time.
  3. Tap Stop — it saves automatically with a short label (like "CP 76M"). Rename it or set the room later.
  4. The finished note appears on your phone and on the web — same account, same charts.
tebIQ mobile home screen with the record orb and today's charts
The mobile home screen (demo data).

Your working note starts with your exact words

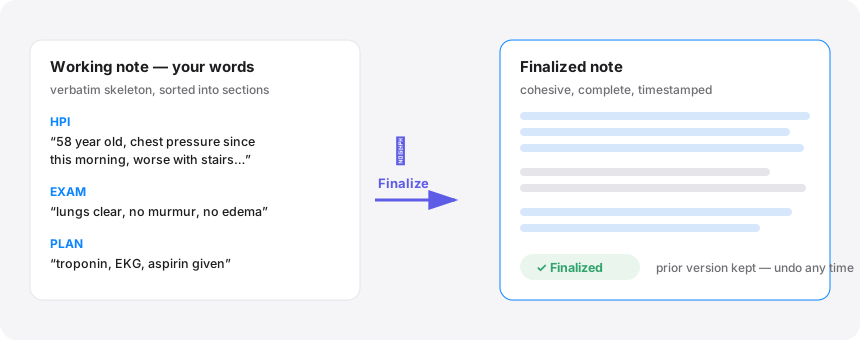
Right after a recording, the note you see is a verbatim skeleton — your own words, sorted into the right sections. Nothing is invented, nothing is embellished.

Why it matters: you can trust the draft at a glance, add to it during the shift, and let the AI polish it only when you say so.

  1. Record a visit — the working note shows what you actually said, organized by section.
  2. Add more any time: dictate again, type into a section, or jot in the ScratchPad.
  3. When you're done, press ✨ Finalize with AI to turn it into a polished, cohesive note (next card).
Diagram: verbatim skeleton on the left becomes a polished finalized note after Finalize
Illustration — from verbatim skeleton to finalized note.

Finalize & Create Note

One AI pass over the whole working note — every entry, addition, and ScratchPad jot — woven into one cohesive, timestamped note.

When: at the end of the visit (or the end of the shift). Everything before this is your safe scratch space.

  1. Open the note and press ✨ Finalize with AI (top right of the note, and in ⋯ More).
  2. Read the finalized note. Your prior version is kept — Undo is one click if you prefer it.
  3. Need to add more after finalizing? Use ↩ Return to ScratchPad, add, and re-finalize — or record an addendum.

You can also just say "command finalize" while dictating — no clicking needed.

Copy the note into your EHR

tebIQ doesn't replace your EHR — it writes the note, you paste it in. One button copies clean, formatted text.

  1. Open the note and click 📋 Copy.
  2. Click into the note field in your EHR and paste (Ctrl/+V).

Tip: ↗ Pop out (in ⋯ More) floats the note in a small always-on-top window over your EHR, so you can copy section by section.

Optimize Billing & Copy

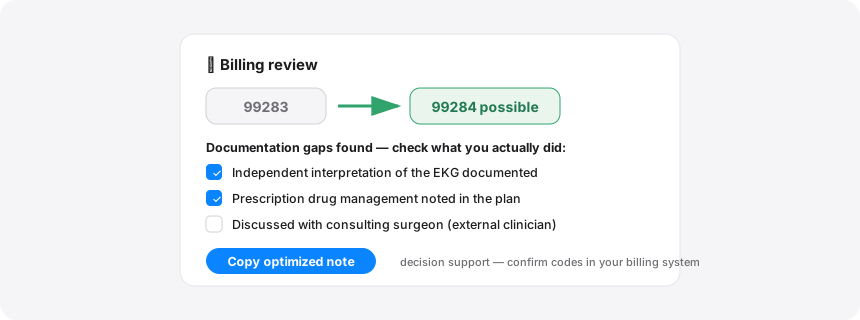
Before you copy, tebIQ reviews the note against E&M documentation rules and shows what's missing for the level of service you actually provided.

When: every discharge-ready note. Under-documented MDM is the most common reason for down-coding.

  1. Click 💰 Optimize & Copy next to the Copy button.
  2. A review opens: the current E/M level and any documentation gaps (data reviewed, risk, differentials).
  3. Check the items you actually did — the note is updated to reflect them.
  4. Click copy — you get the revenue-complete version on your clipboard.

Potential coding and documentation considerations — not a diagnosis or final billing determination. Verify against the patient record, current official code set, and applicable payer policy. Final selection requires authorized clinician or coder review.

Illustration of the billing review: current level 99283, potential 99284, with a checklist of gaps
Illustration — the billing review.

Print, PDF, share & export

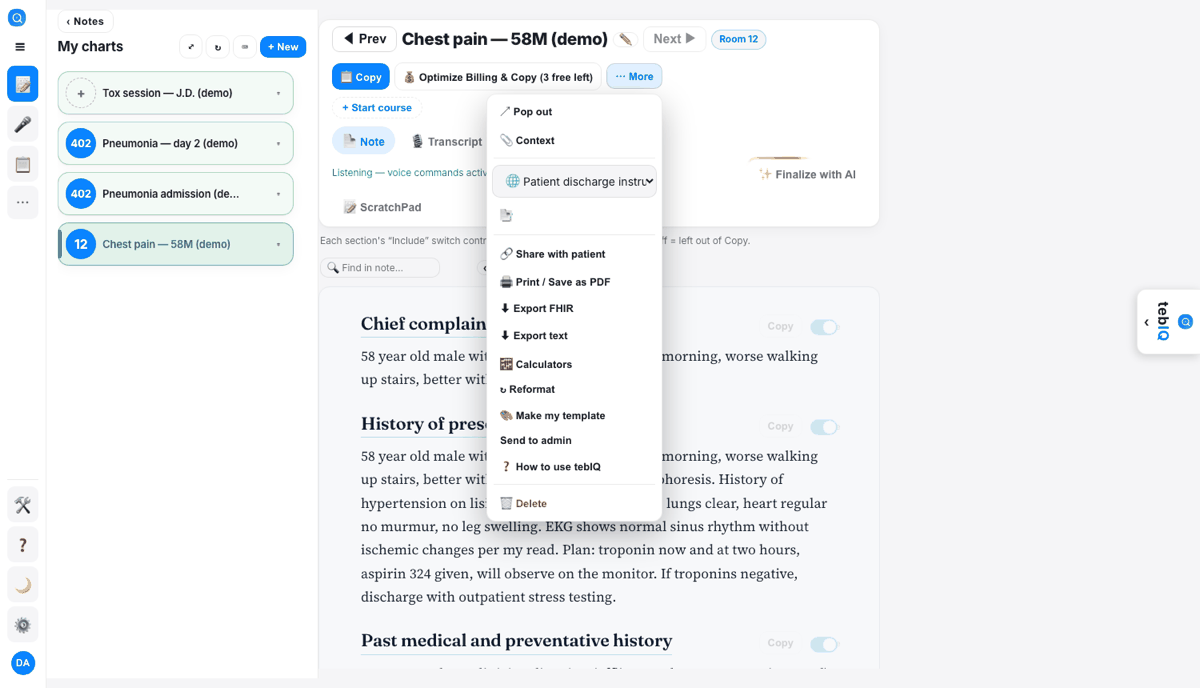
Everything else you'd do with a finished note lives in the ⋯ More menu at the top of the note.

  1. 🖨 Print / Save as PDF — a clean print view; use your browser's "Save as PDF".
  2. 🔗 Share with patient — a secure, expiring link to the visit summary (patient verifies with date of birth).
  3. ⬇ Export FHIR / ⬇ Export text — for EHR or HIE ingestion, or a plain .txt file.
  4. 📑 Create document — discharge summaries, work notes, and other documents generated from this note.
The ⋯ More menu open on a note, showing print, share, export and document options
The ⋯ More menu (demo data).

Forgot your password?

Reset it yourself in under a minute — no email to support, no waiting.

  1. On the sign-in screen, click Forgot password? under the password field.
  2. Enter your account email — tebIQ sends you a reset link.
  3. Open the link, choose a new password, and sign in.

No email after a couple of minutes? Check spam, and make sure you entered the address you signed up with.

Your AI-note counter (free plan)

On the free plan, your account card at the bottom of the left rail shows exactly how many AI notes you have left — for example “12 AI notes left”. No surprises mid-shift.

  1. Glance at the account card (bottom of the left rail) — the counter updates as you generate notes.
  2. Running low? Open ⚙️ SettingsSubscription to upgrade or add a top-off pack.
  3. On paid plans the counter disappears; a monthly usage meter appears only if you approach your plan's fair-use cap.

Recording and dictation always work — the counter only meters AI note generation.

🗂 Longitudinal notes & care courses

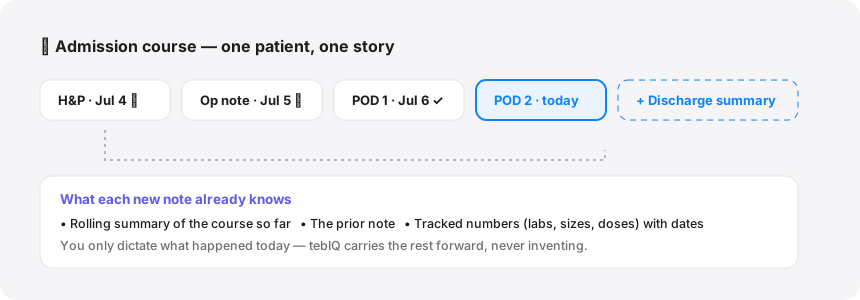
The flagship. One patient, many visits — H&P today, op note tomorrow, rounding all week — connected so each new note already knows the story.

What is a care course?

A care course links every note for one patient's episode of care — an admission, a surgery with follow-ups, or an ongoing clinic relationship. Each note in the course automatically carries the story forward.

Why it matters: your postop day 1 note shouldn't start from a blank page. In a course, it starts from the H&P, the op note, and everything measured since.

  1. Notes in a course appear as tabs across the top of the note — like a chart binder: H&P · Jul 4, Op Note · Jul 5, Progress · Jul 6.
  2. When you record the next visit, tebIQ quietly includes the prior notes and the running summary — you just talk about today.
  3. Courses come in three kinds: Admission, Surgical, and Clinic — plus specialty pathways that track numbers over time (see the pathway list below).
Diagram: a care course as connected tabs — H&P, Op note, POD 1, POD 2, Discharge
Illustration — one course, many notes, one story.

Episode tabs — the whole course at a glance

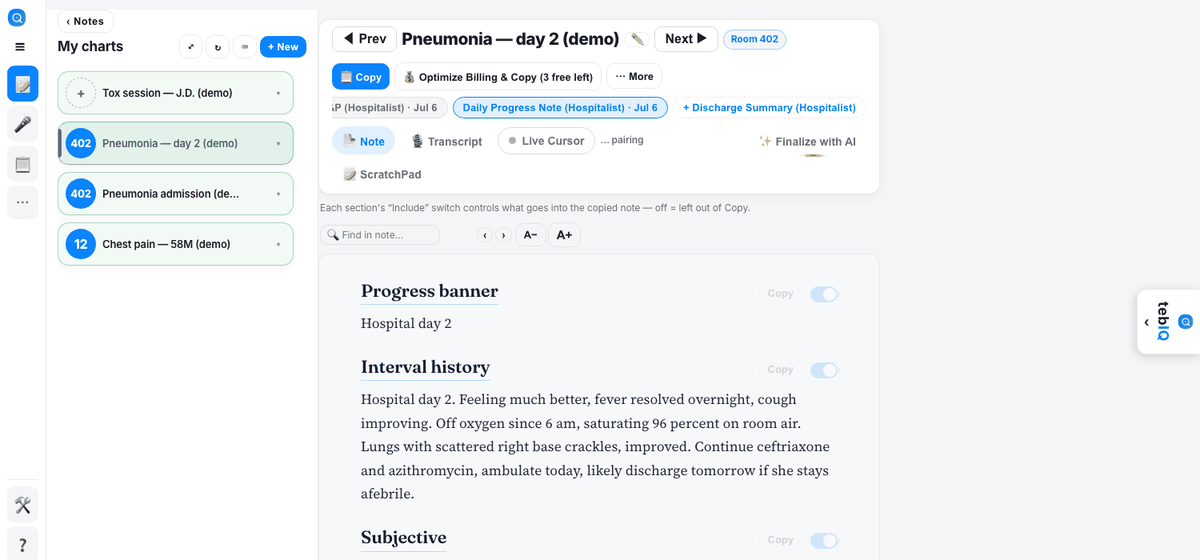
When a note belongs to a course, a tab strip appears above it: one tab per note, in order, with its date. Locked notes show 🔒, finalized ones show ✓.

  1. Open any note in the course — the tabs appear automatically above the note body.
  2. Click a tab to jump to that note. The tab of the note you're reading is highlighted.
  3. The left end shows the course name (for example 🗂 Admission course); the right end offers + next step.
Episode tabs above a note: H&P and Progress tabs plus a dashed + next step chip, with the course summary card below
Episode tabs with the “+ next step” chip (demo data).

“+ next step” — the second visit, in seconds

The dashed + chip at the end of the episode tabs starts the next note in the course — a brand-new note for a new visit, not an addendum to the old one.

When: rounding on yesterday's admission, the postop check, the next prenatal visit — any time you're seeing the same patient again.

  1. Open any note in the course.
  2. Click the dashed chip — it's already labeled with the right next document (for example + Progress note after an H&P, + Op note after a surgical consult).
  3. The recorder opens with the note type pre-selected and the course already attached. Just talk about today.
  4. Generate — the new note appears as the next tab, and the course summary updates.

tebIQ suggests the next step from your specialty's pathway (H&P → Op note → daily progress → discharge…), but you can change the note type before recording if the visit went differently.

Start a course from any note

Any standalone note can become the first chapter of a course — one click, and future visits attach to it.

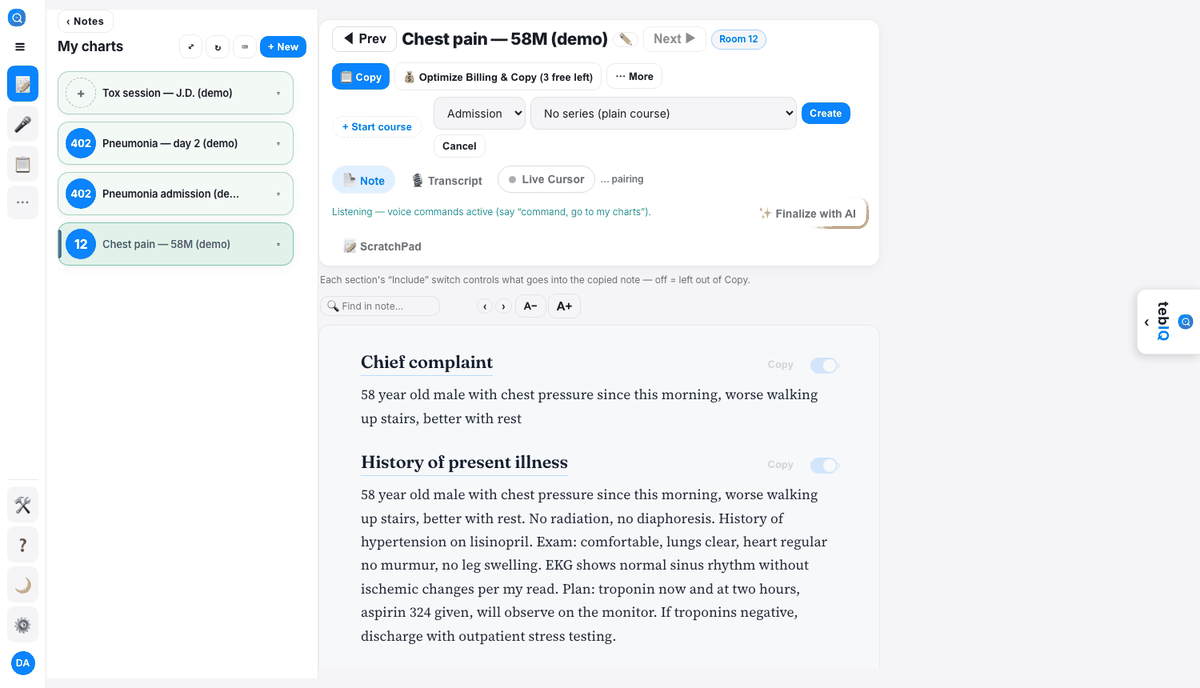
  1. Open the note. Where the tabs would be, you'll see a small + Start course button.
  2. Pick the kind: Admission, Surgical, or Clinic.
  3. Optionally pick a specialty pathway (for example OB Prenatal or Wound Care) — that adds visit-to-visit tracking of the numbers that matter. Or choose No series (plain course).
  4. Click Create. The tab strip appears, and “+ next step” is ready for the next visit.
The + Start course picker open on a note, with kind and pathway dropdowns
The Start course picker (demo data).

The Course summary — what tebIQ remembers for you

Courses on a specialty pathway show a Course summary card under the tabs: the running story, the key numbers from every prior visit, and what's due next.

Why it matters: this same information flows into every new note you record in the course — so the note can say “AAA 4.2 cm, up from 4.1 last year” without you re-dictating the history.

  1. Rolling summary — a short recap of the course so far, updated after each note.
  2. State lines — the tracked facts (last measurement and date, medication doses, intervals). These are carried forward exactly as recorded — never invented.
  3. Next due — the computed next surveillance or follow-up date.
  4. Escalations — red or amber pills when a tracked value crosses a threshold (for example rapid growth on surveillance imaging).

You don't maintain any of this — it updates itself from what you dictate at each visit.

Addendum vs. “+ next step” — which one do I want?

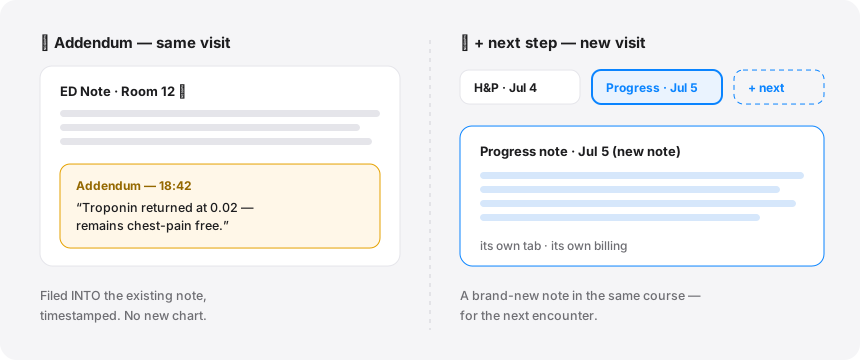
They look similar but do opposite things. An addendum adds to the note you already wrote. + next step starts a new note for a new visit.

➕ Addendum — same visit

“The troponin came back”, “family meeting held”, a correction after signing. It's filed into the existing note, timestamped, as an addendum. On mobile: open the note → record → Stop & file addendum. On web: type in the ScratchPad of a finalized note, or dictate — tebIQ files it where it belongs.

🗂 + next step — new visit

You're seeing the patient again: the next day's rounding, the postop check, the next clinic visit. It creates a whole new note in the same course, with its own tab and its own billing.

Rule of thumb: same encounter → addendum. New encounter → + next step. If it could be billed separately, it's a next step.

Diagram comparing an addendum (attached to the same note) with + next step (a new note in the course)
Illustration — addendum stays inside the note; next step adds a new tab.

Specialty pathways — what's available today

Pathways are pre-built course intelligence for a specialty: the right note sequence, plus visit-to-visit tracking of that specialty's numbers. Pick one when you start a course.

Visit-to-visit tracking pathways (each keeps a running ledger between visits):

ED Observationobs re-assessments, dispo clock
Vascular SurveillanceAAA / graft sizes, next-due imaging
OB PrenatalGA, fundal height, labs by trimester
Dialysis (Monthly MCP)rounding visits, monthly capitation
Cardiology (Longitudinal)EF, device checks, med titration
Heme-Onc (Treatment Line)cycle number, counts, toxicities
Orthopedicsfracture / post-op follow-up
PM&R / Pain (Injury Course)function scores, injection history
Neurology — Post-Strokedeficits, anticoagulation, rehab
Neurology — Seizure / Epilepsyseizure log, drug levels
Wound Care (Serial Checks)wound measurements over time
Psychiatry / Therapyscales, med changes, sessions
Geriatrics / SNF Roundingsubsequent visits, regulatory cadence
Home Care / House Callshome visits, plan continuity
Palliative / Hospicesymptom scores, goals of care
Family Medicine (Panel)chronic follow-ups (DM, HTN…)
Concierge / DPCmembership-year continuity
Rheumatology (Treat-to-Target)disease activity scores, biologics
Endocrinology (Titration)A1c / TSH targets, dose ladders
Neuropsych Pedsevaluation time ledger, med follow-up
Urology (Surveillance Ledgers)PSA, active surveillance
Dermatology (Lesion Map)lesions pinned on a body map
Medispa / Aestheticsinjections & units on a face map

Admission & surgical courses (the note sequence routes itself):

EmergencyED note (the founding template)
Hospitalistadmission H&P → daily progress → discharge → follow-up
Surgery (global period)consult → pre-op H&P → op report → post-op daily → discharge → post-op clinic
OB — Labor & DeliveryL&D admission → delivery note → postpartum discharge
Nephrology inpatientconsult → AKI progress
Cardiology / Orthopedics / Vascular admissionsconsult or H&P → op/progress → discharge
Telehealth is a layer, not a pathway: any course can mark a visit as telehealth and the compliance details (modality, consent, location) fold into the note automatically.

🎙 Dictation everywhere

Your phone is the microphone; the words land wherever you're looking — a tebIQ note, or your EHR.

Live Cursor — dictate from your phone into your desktop

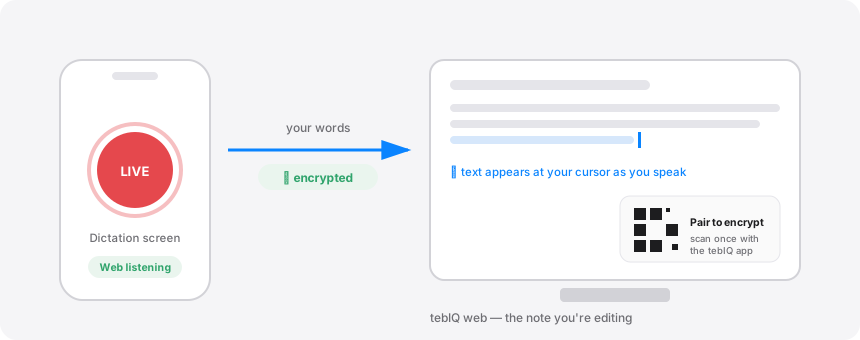
Turn on Live Cursor and your phone's dictation streams straight into the note on your computer, right at your cursor — end-to-end encrypted after a one-time QR scan.

When: you like editing on the big screen but talking into your phone — or your desktop has no good microphone.

  1. On the web, open a note and click Live Cursor (just above the note body).
  2. A QR panel appears: 🔒 Pair to encrypt. On your phone, open the Dictation screen and tap Pair to encrypt (scan web QR), then scan it. The web badge flips to 🔒 E2EE — after that, the server can't read your dictation.
  3. On the phone, choose 🖥 Live Cursor (web) and tap Go Live.
  4. Talk. Words appear at your cursor on the desktop the moment you say them — no settle delay. Click into a different section — the words follow your cursor.

Voice commands work here too: "tebIQ, go to room 6" switches notes without touching the mouse. Pairing is per-session; you'll scan again next time for a fresh key.

Diagram: phone scanning a QR code on the desktop, then streaming encrypted dictation into the note
Illustration — pair once with the QR, then dictate phone → desktop.

tebDictate™ — dictate into any web EHR

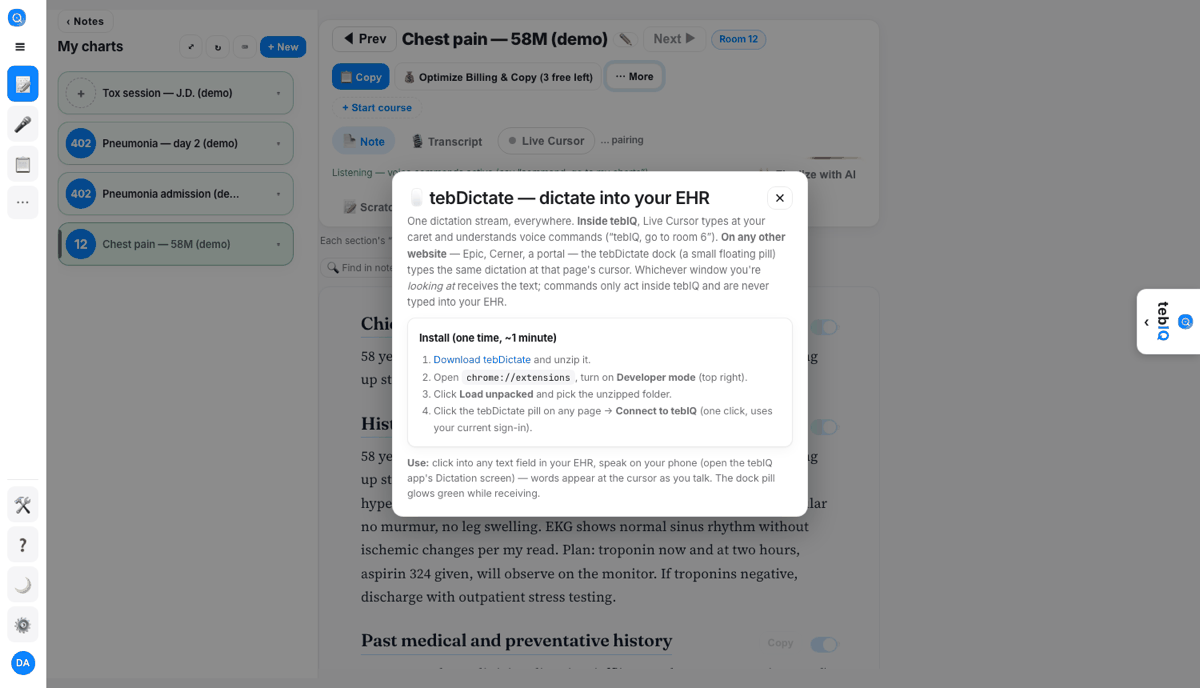
A small browser extension that types your phone dictation into any website — Epic, Cerner, a portal. Whichever window you're looking at receives the text.

  1. In the left rail, open ⋯ More🖱 tebDictate and follow the one-minute install (download, then Load unpacked in your browser's extensions page).
  2. Click the small tebDictate pill on any page → Connect to tebIQ (one click, uses your sign-in).
  3. Click into any text field in your EHR, then speak on your phone (Dictation screen). The words type at that page's cursor; the pill glows green while receiving.

Voice commands only act inside tebIQ — they are never typed into your EHR.

The tebDictate install dialog inside tebIQ
The tebDictate setup dialog.

📱 Also available as a free tebDictate app for iPhone.

Voice commands

While dictating, a few spoken phrases control tebIQ so you never need the keyboard mid-encounter.

  1. "command finalize" — runs Finalize with AI on the open note.
  2. "command run clinical panel" — refreshes the Clinical Intelligence panel.
  3. "tebIQ, go to room 6" — jumps to that room's note (Live Cursor / tebDictate).
  4. "add my exam" — expands your dot phrase named "exam" into the note.
  5. "sign out room 13, 12 to Dr. Smith" — starts the handoff flow (next card).

Sign out rooms by voice

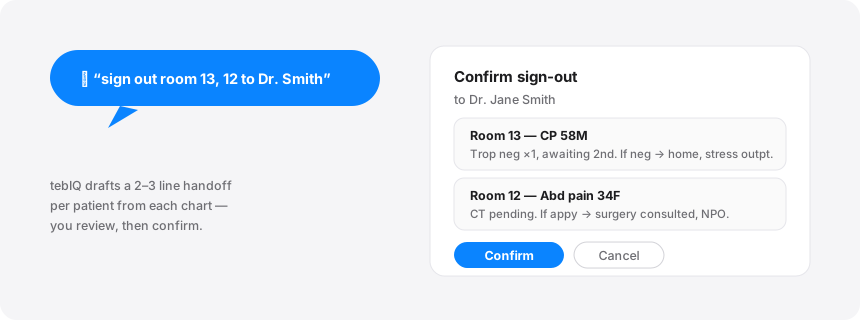
Say who gets which rooms and tebIQ drafts a tight 2–3 line handoff per patient, shows you a confirmation card, and delivers it to the receiving doctor.

When: end of shift, or handing a couple of patients over before a procedure.

  1. Say: "sign out room 13, 12 to Dr. Smith".
  2. A confirm card appears listing the rooms and the recipient — check it's right.
  3. Tap Confirm. Each patient gets a concise handoff summary generated from their note, and Dr. Smith is notified with links to the charts.
Illustration of the sign-out confirm card: rooms 13 and 12 to Dr. Smith with Confirm and Cancel buttons
Illustration — the sign-out confirm card.

The Dictations list

Dictations you record into the phone's Dictation box (not streamed anywhere) collect in one list on the web, ready to use.

  1. Left rail → ⋯ More🎙 Dictations.
  2. Open one to read or copy it, or turn it into a note.
  3. Use Pop out for a floating column that stays on top of your EHR while you transcribe from it.

🧠 Clinical intelligence

Decision support that reads the note so you don't have to re-read it. Always suggestions — you decide.

The Clinical Intelligence panel

The slide-out tebIQ panel reads your note and surfaces what matters: a deterministic sepsis screen (SIRS/qSOFA from the vitals you dictated), suggested billing, and the AI's top-3 differential with plans.

  1. With a note open, click the tebIQ › tab on the right edge — the panel slides out.
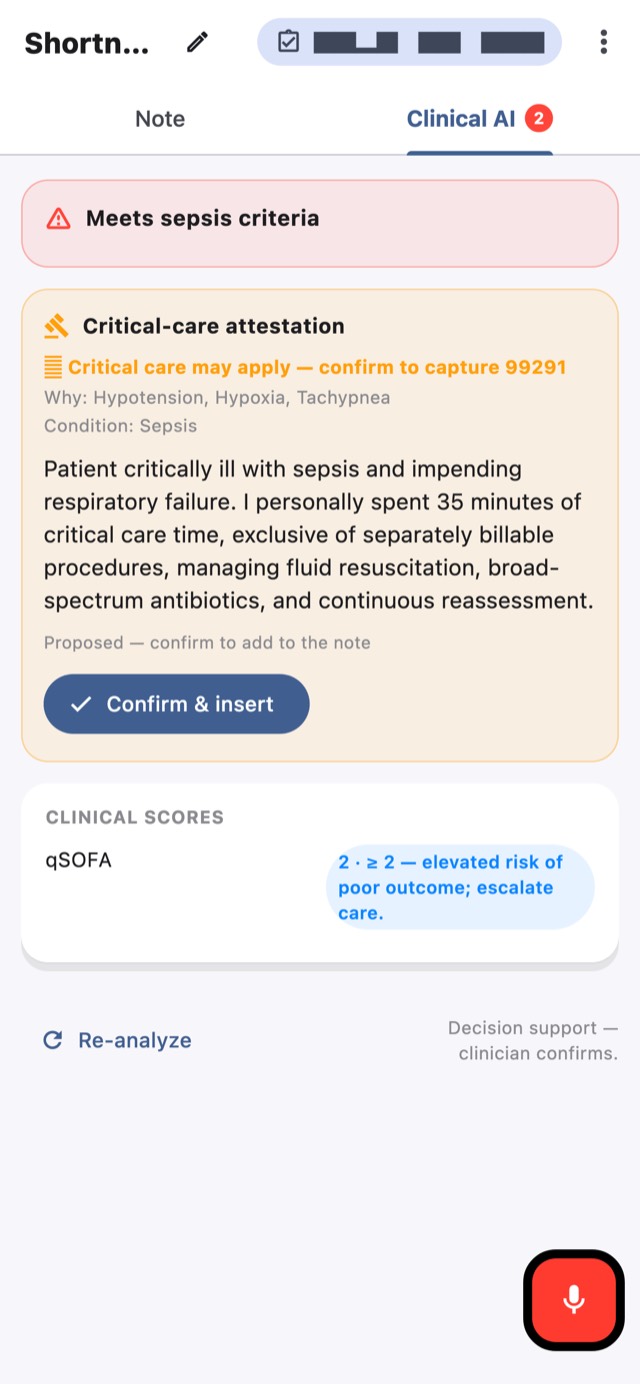
  2. Click 🧠 Clinical Panel — DDx · MDM · Critical care for the full AI review: top 3 differentials with ICD-10 codes, MDM pitfalls, scores, and critical-care checks.
  3. 🚨 red and ⚠️ amber safety flags pin to the top — sepsis physiology, can't-miss diagnoses, drug interactions.
  4. The Billing card shows the suggested E/M code and RVUs as you document.

The panel runs once, the first time a note opens, and stays put ("once-and-done") — it won't churn or rewrite itself while you edit. When you want a fresh read after new information, click ↻ Re-run panel at the bottom of the card. Answers are short and plan-first — the top diagnoses and what to do, not an essay. Your admin controls which agents run and when (Agent Control).

The tebIQ panel open at the right: Ask tebIQ, Billing with E/M code, Clinical Intelligence, orders and discharge instructions
The tebIQ panel, slid out beside a note (demo data).

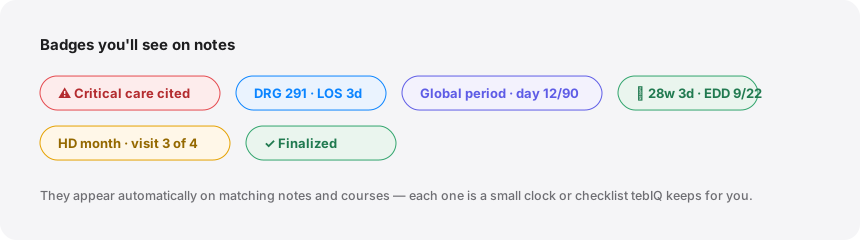
Critical care alert & the “Critical care cited” badge

When your documentation shows critical-care-level work, tebIQ proposes the attestation (time-based, in your words) — you confirm it, never auto-added. Once cited, the note carries a pinned Critical care cited badge.

  1. Document as usual. If the note supports critical care, an alert appears in the panel with a proposed attestation.
  2. Review the time and the wording; confirm to add it to the note.
  3. The badge stays pinned on the note (and shows on the note list) so at end of shift you can see which charts carry critical care time.
Illustration of note badges: critical care cited, DRG, global period day, pregnancy tracker, dialysis month
Illustration — the badge family.

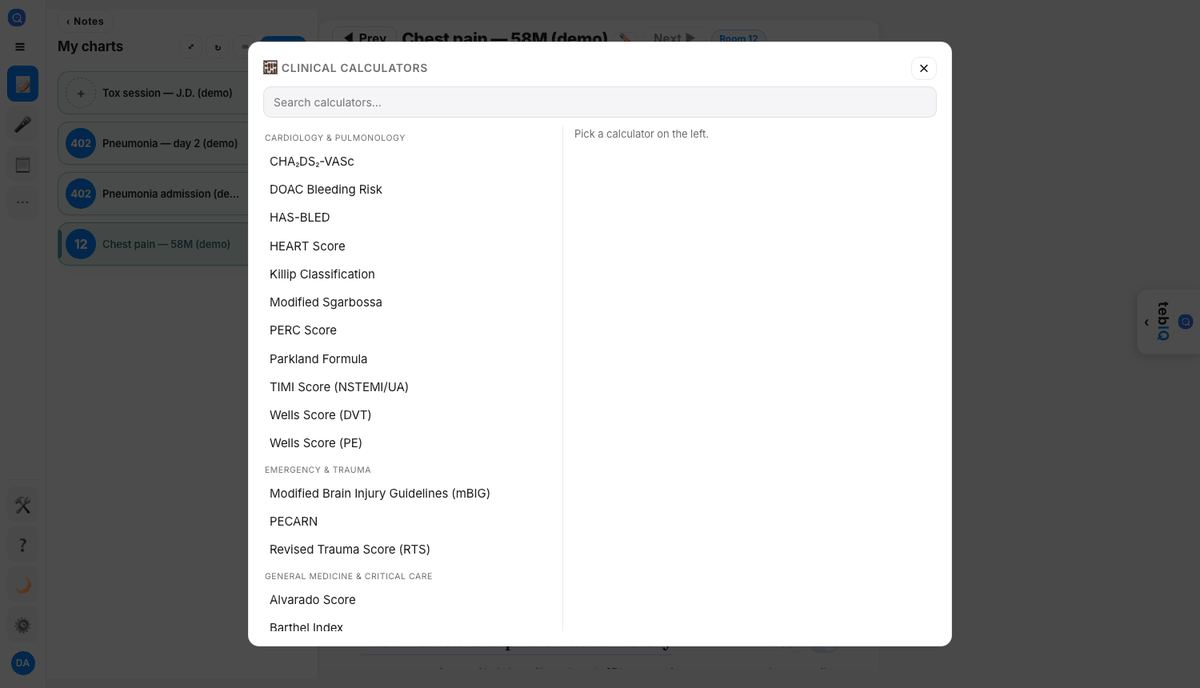
Score calculators (MDCalc-style)

The scores you'd normally open another tab for — computed from what's already in the note, with every input shown so you can verify. All pure math, no AI in the arithmetic.

  1. Open the note's ⋯ More menu → 🧮 Calculators.
  2. Pick a score (HEART, Wells, CURB-65, qSOFA, and more). Inputs pre-fill from the note where possible.
  3. Adjust anything that's missing, and insert the result into the note if you want it documented.

The searchable calculator library goes further than scores: a burn calculator with a clickable body diagram (rule-of-9s / Lund-Browder %TBSA and Parkland fluids), ABG interpretation, CrCl / CKD-EPI, corrected sodium, and everyday dosing math.

The calculators window with a list of clinical scores
The Calculators window (demo data).

Stay, pregnancy, dialysis & global-period trackers

Small badges on the note keep the administrative clock for you — no separate spreadsheet.

  1. Stay tracker / DRG — inpatient courses show length-of-stay and the working DRG picture as you round.
  2. Global period — after surgery, each follow-up shows where you are in the global period (for example Day 12 of 90), so billable vs. included visits are obvious.
  3. Pregnancy tracker — prenatal courses show gestational age and EDD on every visit.
  4. Dialysis month — nephrology rounding counts visits toward the monthly MCP automatically.

These appear automatically on courses of the matching pathway — nothing to configure.

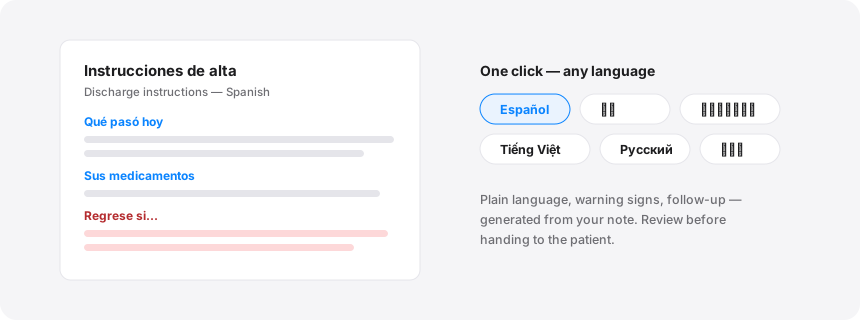
Discharge handout — in the patient's language

A patient-friendly handout generated from the note: what happened, medication changes, warning signs, follow-up — in any language you choose.

  1. Slide out the tebIQ › panel and find Patient discharge instructionsCreate instructions — or use the document picker in ⋯ More.
  2. Pick the language and create it.
  3. Print it or share it with the visit-summary link.

Handouts use plain, 6th-grade language and link to trusted patient education. Review before handing out — it's generated from your note.

Illustration of a discharge handout document with language options
Illustration — one click, any language.

Pediatric dose calculator

Weight-based dosing for common pediatric medications, computed deterministically from a physician-reviewed formulary — with the safe range always shown.

  1. On a pediatric note, find the Pediatric Dosing card in the right panel.
  2. Pick the drug and confirm the weight (pre-filled if you dictated it).
  3. Read the calculated dose and the safe range; document it in the plan if used.

This feature is enabled per clinic by your admin. Doses are decision support — verify against your local formulary.

Ask tebIQ — an expert consult on the chart

Ask a clinical question about this patient and get a structured, referenced answer that has actually read the note. Threads are saved per note, so you can come back to them.

  1. With a note open, slide out the tebIQ › panel — 💬 Ask tebIQ is the top card.
  2. Type your question — "safe to discharge on apixaban given the fall risk?" — and press Ask.
  3. Click to pop the thread out into a big, readable window; keep asking follow-ups in the same thread.

Answers use the patient facts from this note and cite authoritative guidelines (GOLD, GINA, AHA/ACC…). It's a consult, not an order — clinical judgment stays yours.

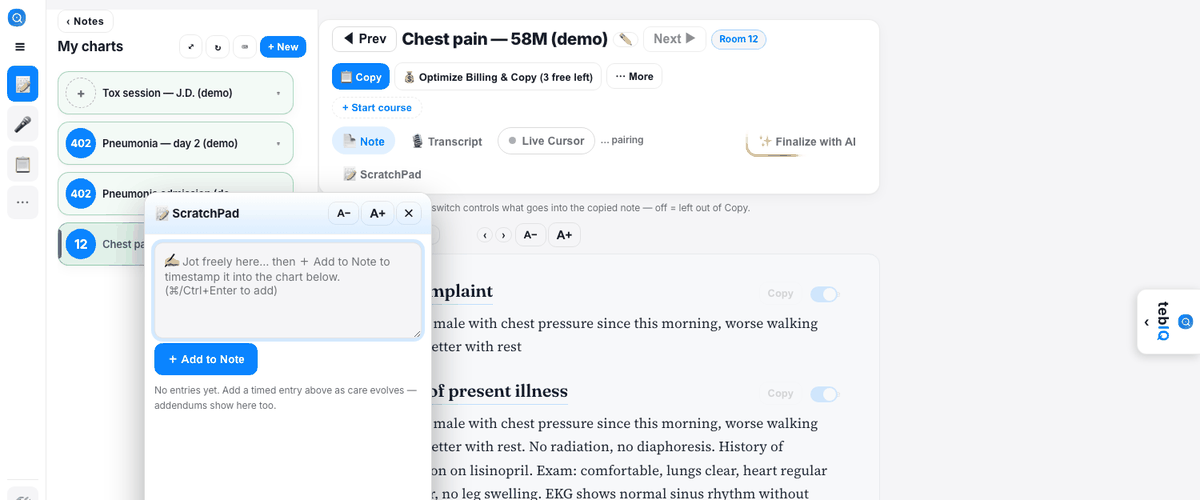
ScratchPad — your shift-long scratch paper

A yellow pad that floats next to the note. Everything you jot is timestamped and woven in when you finalize — after finalizing, jots become addenda.

  1. Click 📝 ScratchPad at the top of the note.
  2. Type a quick line ("repeat lactate 1.8, po challenge ok") and press Add — it lands with a time stamp.
  3. Finalize when ready — your jots are integrated into the note in order.
The yellow ScratchPad open beside a note with timestamped entries
The ScratchPad (demo data).

Context documents — give the AI the paper

Attach images, PDFs, screenshots, or pasted text (labs, a prior note, a med list) — the AI uses them as context the next time it writes for this note.

  1. Note → ⋯ More📎 Context.
  2. Upload a file, paste a screenshot (Ctrl/+V), or paste text.
  3. Finalize, add an addendum, or Ask tebIQ — the attachments inform the result (they're never copied in verbatim).

📍 Procedure documentation

Hands full, gloves on — dictate the procedure and fix the details after.

Procedure Map — injections & lesions on a body diagram

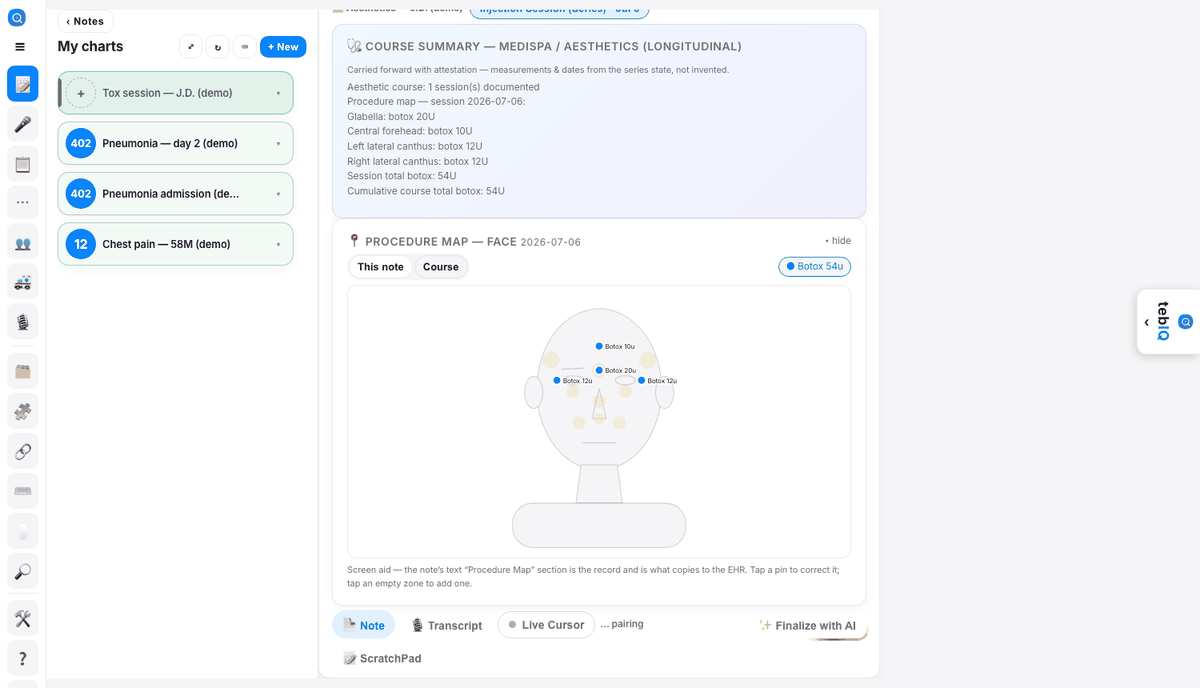
On dermatology and medispa notes, everything you dictate — "10 units glabella… 4 units left crow's feet" — lands as pins on a face/body diagram, with the units totalled and reconciled against what you said.

When: injectables, biopsies, lesion checks — any visit where where matters and your gloves are on.

  1. Record the procedure hands-free, naming sites and units as you go.
  2. Open the note — the map card shows a pin per site with its units/details.
  3. Gloves off? Tap any pin to edit — move it, fix the units, add laterality. The note text stays the source of truth; the map is your visual check.
  4. If the dictated units don't add up (total vs. per-site), the map flags the mismatch so you catch it before signing.
A face diagram with injection pins and unit labels on a medispa note
The Procedure Map (demo data).

📋 Organize your day

My ED Board

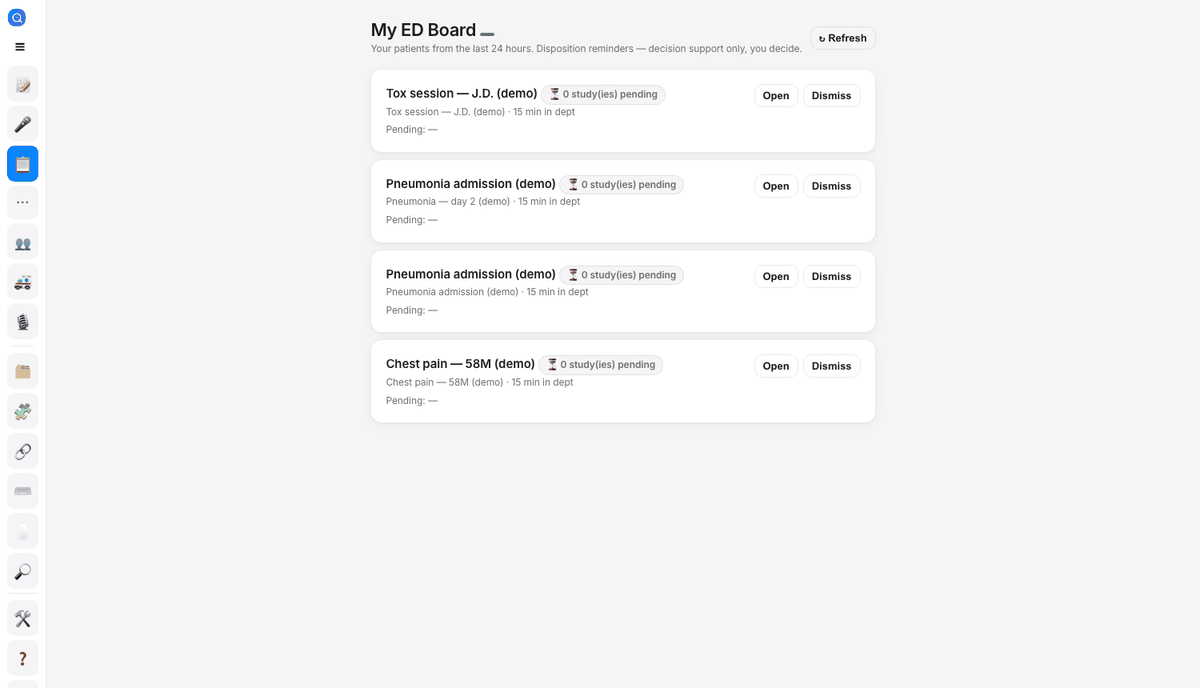
Your patients from the last 24 hours on one board, with disposition reminders — a decision-support overlay on your own charts, not a department tracker.

  1. Left rail → 📋 ED board.
  2. Each card shows the room, the chart, and where things stand (results back? dispo documented?).
  3. Click a card to jump into the note. ↻ Refresh re-checks everything.
The My ED Board view listing recent patients
My ED Board (demo data).

Patients & the patient chart

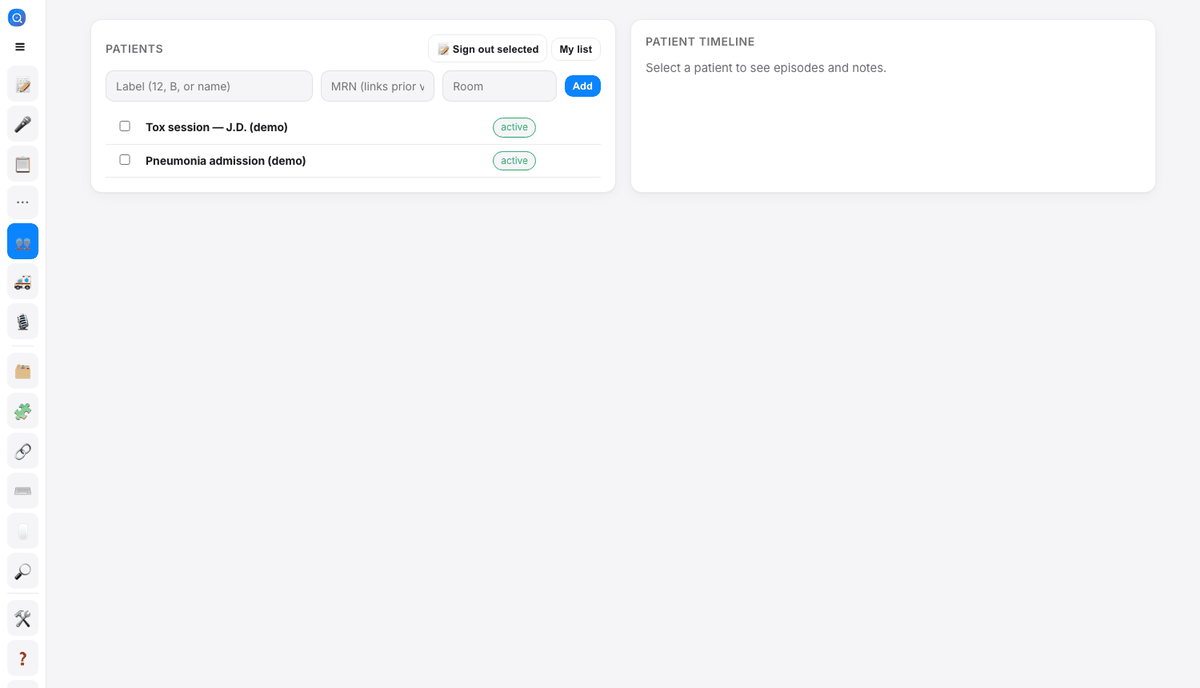
Every patient you've documented gets a chart: a visit timeline on the left, and the notes for the visit you click on the right — courses grouped as single visits.

  1. Left rail → ⋯ More👥 Patients.
  2. Search or click a patient to open their chart.
  3. Click a visit in the timeline to read (and copy from) its notes.
The Patients view with the patient list
The Patients view (demo data).

Templates — and “Make my template”

tebIQ ships 30+ specialty note types — the full ED note, H&P, progress, consult, op note, discharge summary, reassessment, work/school note, and more. Templates let you shape them further — and the fastest way to make one is from a note you already like.

  1. Open a note whose format you like → ⋯ More🎨 Make my template. Edit and save.
  2. When starting a new note, pick your template from the Template dropdown.
  3. Picked the wrong format after the fact? ↻ Reformat regenerates the note from the same dictation with a different specialty, note type, or template.

Dot phrases — your text shortcuts

Reusable text macros, like your EHR's smart phrases. Type . in any note and a dropdown of your phrases appears at the cursor — keep typing to filter, pick one, it expands in place. Instantly, no waiting.

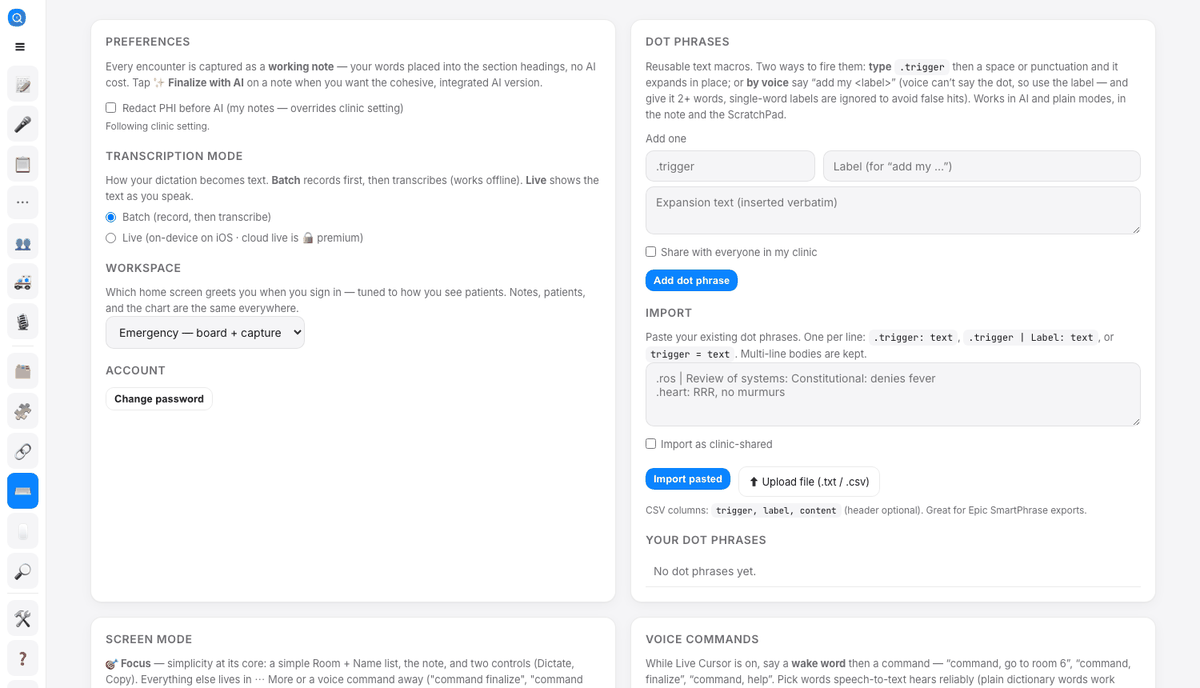
  1. Left rail → ⋯ More⌨️ Dot phrases. Add a trigger (like exam) and its full text.
  2. In any note, type . — the dropdown lists your phrases; type .ex to narrow it, then pick (or just finish typing .exam and it expands on its own).
  3. Don't remember your triggers? Each section header shows a small chip — click it to see the phrases that fit that section and insert one at the end.
  4. A phrase can be scoped to a section (an exam phrase that only offers itself in Physical Exam) — set the section when you save it. Global phrases show everywhere.
  5. Phrases can include choices like {left/right/bilateral} — a picker pops up when it expands.

Hands busy? Say "add my exam" while dictating and the phrase named exam drops in. One expansion is one undo — Ctrl/+Z restores exactly what you typed. Coming from Epic? Settings has a one-paste SmartPhrase import.

Summarize a file

Drop in an outside record — a faxed PDF, a photo of a med list — and get a quick summary without creating a note.

  1. Left rail → ⋯ More🔎 Summarize a file.
  2. Upload the image or PDF; read the summary. Nothing is saved to a chart unless you copy it there.

📱 The mobile app

Same account, same charts — plus tools that only make sense in your pocket.

tebIQ in your phone's browser — no app needed

Open tebIQ in Safari or Chrome on your phone and the whole app reshapes for one hand: your charts and the AI panel become slide-in drawers, and a big red mic button sits at your thumb.

  1. 📋 Charts (top left) slides in your note list; 💡 tebIQ (top right) slides in the assist panel. Tap outside either to close it.
  2. The red mic button at the bottom starts a recording from anywhere. It tucks away while you scroll down to read and pops back the moment you scroll up.
  3. ☰ opens the full menu — everything from the desktop rail is there.

It's the same account and the same charts as the desktop — this is for the moments you're away from a computer but need the browser, not the app.

Your notes on the phone

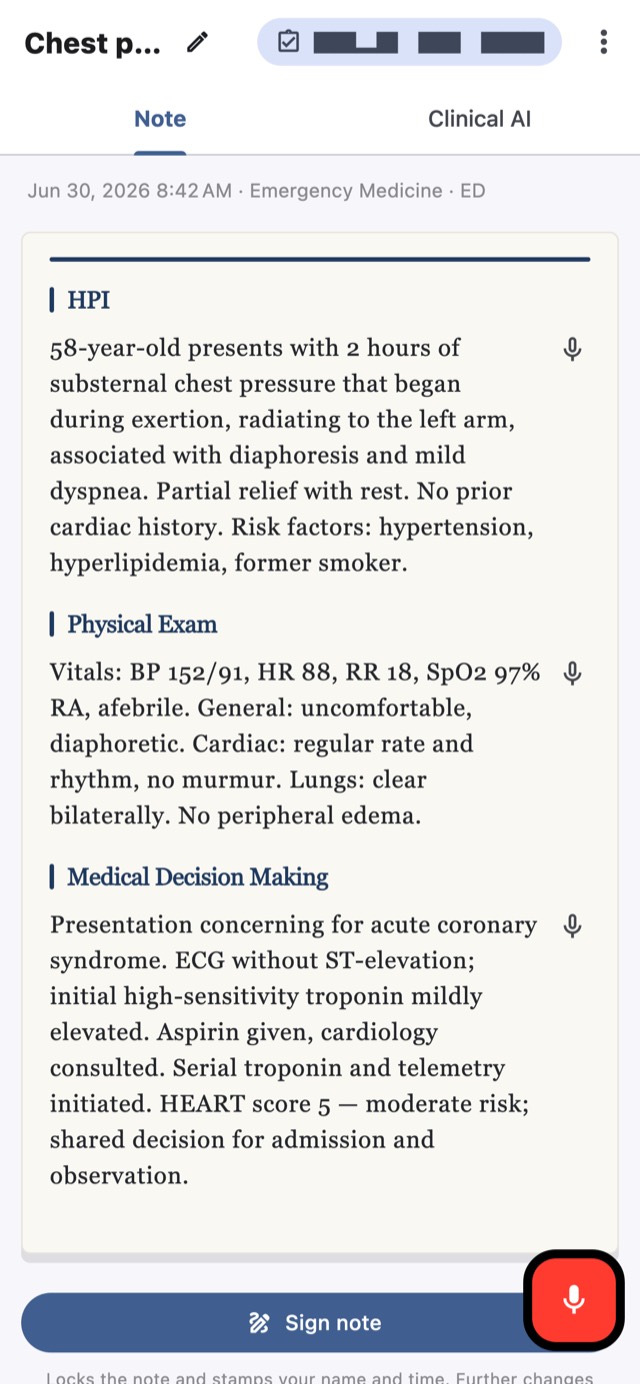
Every chart is on your phone seconds after you record it — structured into sections, readable at a glance, editable on the spot.

  1. Tap a chart on the home screen to open it.
  2. Sections render just like the web note; tap to read or edit.
  3. Use + next step on a course note to record the next visit right from the phone.
A structured note on the mobile app
A structured note on mobile (demo data).

AI Expert on the phone

The same expert review as the web panel, in a sheet you can pull up over any note.

  1. Open a note and tap AI Expert.
  2. The differential and recommendations slide up; drag the sheet taller to read comfortably.
The clinical AI sheet on mobile
Clinical AI on mobile (demo data).

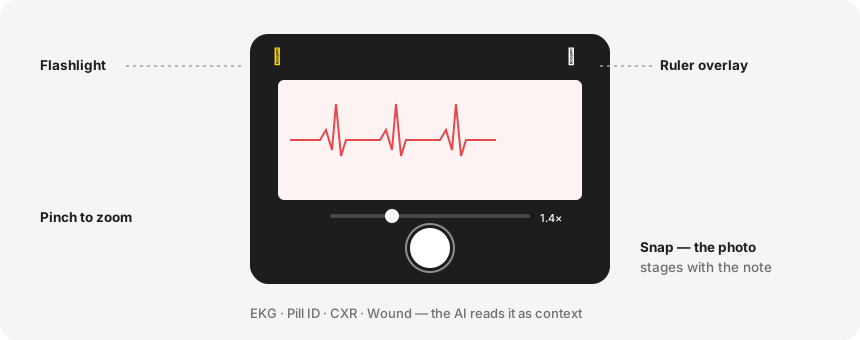
Picture mode — EKGs, pills, wounds

Photograph an EKG, a pill bottle, an X-ray on a screen, or a wound — the image attaches to the note and the AI reads it as context.

  1. On the record screen, swipe the mode carousel to Picture.
  2. The clinical camera opens: pinch to zoom, flashlight top-left, an on-screen ruler for wounds top-right.
  3. Snap — the photo stages with your note.
Illustration of the clinical camera with zoom, flashlight, and ruler controls
Illustration — the clinical camera.

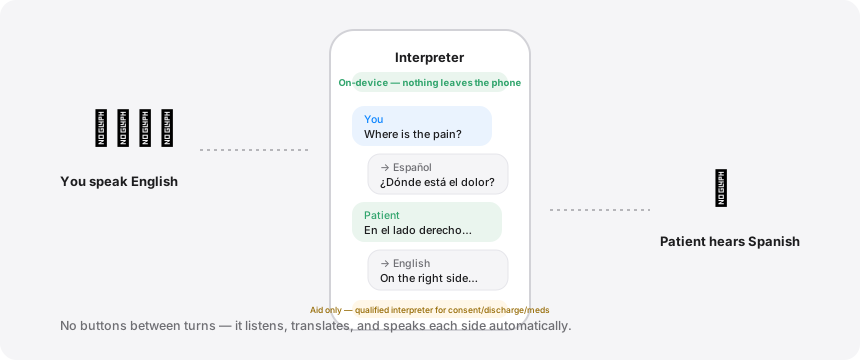
Interpreter aid — bedside conversation in 2 languages

Conversation mode listens to both of you and speaks each side in the other's language — entirely on the phone. “On-device — nothing leaves the phone.”

When: routine bedside conversation while you wait for — or can't reach — an interpreter service.

  1. First, download languages (needs a minute on wifi): Settings → Interpreter languages → tap each language you see often (~60 MB each). Do this before the shift, not at the bedside.
  2. Open Interpreter from the home screen, pick the patient's language, tap Start conversation.
  3. Talk normally — no buttons between turns. The screen shows both sides of the conversation as it goes.
  4. Tap the save icon to keep the transcript with a note.

Important — it's an aid, not an interpreter. tebIQ Interpreter is an aid for routine bedside conversation. It is not a qualified medical interpreter. For consent, discharge instructions, medication changes, or emergencies, use a qualified medical interpreter.

Illustration of conversation mode: clinician and patient speech bubbles in two languages, on-device badge
Illustration — conversation mode.

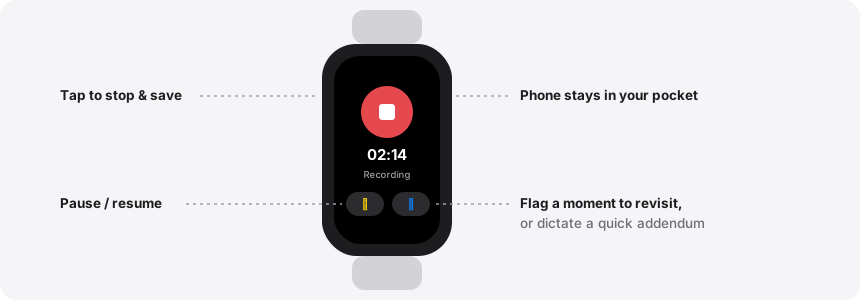
Apple Watch & Wear OS

Start, pause, and stop recordings from your wrist — your phone can stay in your pocket for the whole encounter.

  1. Install the watch app (it comes with the phone app; open the Watch app on iPhone or the Play Store on Wear OS).
  2. Tap record on the watch — the phone records; the watch shows the running time.
  3. From the wrist you can also flag a moment (mark something to revisit) or dictate a quick addendum to the last note.
Illustration of a smartwatch showing a recording in progress with pause and flag buttons
Illustration — recording from the wrist.

On-device vs. cloud transcription

On the free tier, transcription runs on your phone — it works offline and audio never leaves the device. Premium adds cloud transcription for faster, more accurate results on long recordings.

  1. Settings → Transcription to see which mode you're using.
  2. Premium users can switch between on-device and cloud per preference.

⚙️ Settings & preferences

Make tebIQ yours: workspace, transcription & defaults

Two minutes in Settings and every new note starts the way you like it.

  1. Left rail → ⚙️ SettingsSettings & preferences.
  2. Workspace — pick the home screen that greets you when you sign in (for example Emergency — board + capture).
  3. Transcription modeBatch (record first, then transcribe — works offline) or Live (see the text as you speak).
  4. Redact PHI before AI — a personal privacy toggle that overrides the clinic setting for your notes.
  5. Manage your dot phrases here too — including a one-paste import of your Epic SmartPhrases.

Your default note format lives under Templates: mark one ☆ Default on the recorder, and every new note uses it. The per-note Specialty and Note-type pickers stay on auto unless you choose.

The settings page with specialty and note type preferences
Settings (demo data).

Notes & Export — make the note read like your letterhead

One settings card controls how your notes look on screen and in Copy / PDF — typeface, paper, accent color, signature block, and which buttons sit on the note toolbar.

  1. ⚙️ SettingsNotes & Export.
  2. Skip empty sections on Copy & PDF — sections that just say “None” or “N/A” are left out of what you paste; the note on screen never changes.
  3. Export typography and Note paper — the typeface for pasted/PDF output, and the on-screen paper style. Accent color tints buttons and highlights.
  4. Note toolbar layout — choose which actions sit on the toolbar and which live under ⋯ More. Actions can move, never disappear.
  5. Signature block — name, credentials (e.g. MD, FACEP · NPI), and clinic line, appended to every Copy and PDF. Leave blank for none.

A live preview at the bottom of the card shows exactly what your exported note will look like as you change things.

Use tebIQ in your language

The interface speaks 12 languages: English, Español, Français (France and Canada), العربية, فارسی, हिन्दी, Português, Italiano, 中文, Русский, and 日本語 — including full right-to-left layout for Arabic and Farsi.

  1. Before signing in: the 🌐 globe on the login screen.
  2. Signed in: your account menu (bottom of the left rail) or ⚙️ Settings — pick the language; the app switches immediately.
  3. Your choice sticks on this browser and applies every time you sign in.

Your interface language and your note language are separate — notes generate in the language you dictate (or the note-language setting), whatever the menus speak. This guide is in English for now; translations are coming.

Theme, and Focus vs. Pro mode

Two switches at the bottom of the left rail change how the whole app feels.

  1. 🌙 Theme — light or dark, one tap.
  2. Mode🎯 Focus shows a simple Room + Name list, the note, and two buttons (Dictate, Copy). 🛠 Pro shows the full workspace with billing, panels, and every control. Everything hidden in Focus stays one ⋯ More click (or voice command) away.

If tebIQ ever feels busy, switch to Focus — it's the same engine with calmer clothes.

🛡 For admins

If you run the group, two things you'll want on day one.

Invite your team

Add colleagues with a shareable link — no IT ticket, no email server setup.

  1. Open the Admin console → Subscription & seatsInvite users.
  2. Paste their emails (one per line) and choose what the invite grants (for example a trial).
  3. Click Create invites and share each link. The recipient sets a password and is in.

Agent Control — tune the clinical AI per clinic

Every clinical agent (sepsis screen, critical care, scores, drug interactions…) can be turned on or off, given a different AI model, and told when to run — for your whole clinic.

  1. Admin console → Agent Control.
  2. Per agent: toggle on/off, pick the model, and set the trigger — run on every note, only at Finalize, or on-demand only.
  3. Save — new notes clinic-wide follow the new rules.

Also in Admin: templates & the Prompt Builder (custom buttons your clinicians see on notes), specialty pipelines, and usage reporting.

No matches for “

Try one of these, or a simpler word:

Can't find it? In the app: account menu → 💬 Help & feedback — a human reads every message.
← Back to tebIQ